
While you are reading this, I am lounging on the beach in the Caribbean!! Adam & I went back to where we went on our honeymoon and I can’t wait to tell you all about it when we get back next week. I will only be checking in online a few of the days we are there so if I’m slow to respond to your comments I will get to them as soon as possible. While I’m gone I am honored that Nikki of Pennies on a Platter graciously agreed to guest post for me today. Nikki is such a sweetheart and her blog is one of the very first blogs I read many years ago and I haven’t stopped reading since. She has such great recipes and creative ideas! Definitely go check out her site, it is one of my very favorites!! And you can also follow her on facebook, twitter, and pinterest. These buns look so delicious, I can’t wait to try them! Also, don’t worry I have another post scheduled for while I’m gone, so stay tuned for that.

Hey everyone! I’m so happy to be here guest-posting on Stephanie’s blog. I can’t even count how many years I’ve been reading and loving her recipes. So, I’m honored to be here today.
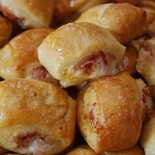
Now, I know Memorial Day just passed, but I thought I’d still share with you how you can make your own hot dog buns. Plus, the 4th of July holiday is quickly approaching, so you can start whipping these up now and store in your freezer for a big party! Trust me, your guests will be impressed.
I’m assuming the majority of you have never even considered making your own hot dog buns, but let me assure you on how easy it is. Simply mix your ingredients, knead them together, allow to rise, shape into buns, rise again and then bake. Okay, that might sound like a lot of work, but it’s well-worth every bite! And, if you are in the habit of toasting your buns on the grill…you’ll love them even more.
Hot Dog Buns
Recipe Note: I used instant yeast which is reflected in my version of the recipe. For instructions on using active dry yeast and proofing, please refer to the original source listed at the end of this post.
Yield: 9 buns
Ingredients:
olive oil, for coating
3-4 cups flour
1 tablespoon sugar
1 teaspoon salt
2 teaspoons instant yeast
1/4 cup warm water
1 cup warm milk
1 tablespoon vegetable oil
1 egg, beaten with 1 tablespoon water (for egg wash)
sesame seeds or poppy seeds (optional)
Directions:
Oil a large bowl with 1-2 tablespoons olive oil; set aside. In the bowl of a stand mixer fitted with the dough hook, stir together 3 cups of the flour, sugar, salt and instant yeast. Beat in the 1/4 cup water, milk and oil until combined, scraping the sides of the bowl as necessary.
With the mixer on low speed, add the additional flour one large spoonful at a time until the dough pulls away from the sides of the bowl. Continue to knead for 5-7 minutes, until the dough becomes smooth and elastic. Place the dough in the oiled bowl, turning once to coat the top. Cover tightly with plastic wrap and let rise until doubled in bulk, about 45 minutes to 1 hour.
Transfer the dough to a lightly oiled work surface and divide it into 9 equal pieces. Shape each piece into a ball, then roll the balls into cylinders, about 4 1/2 inches in length. Slightly flatten each cylinder. Place each bun next to each other, on a lined baking sheet with the sides of the buns just barely touching. Cover with a kitchen towel and let rise until almost doubled, about 45 minutes.
Meanwhile, adjust rack to the lower third of the oven. Preheat the oven to 400˚F. Just before baking, lightly brush the tops of the buns with the egg wash and sprinkle the sesame or poppy seeds (optional). Bake for about 20 minutes. (If the tops are browning too soon, loosely cover with foil for the rest of the baking time.) Remove buns from the baking sheet and cool completely on wire rack.
*To freeze: Freeze in a labeled freezer bag. For best freshness the next day, freeze any leftovers immediately then thaw in microwave for 45 seconds to 1 minute.
Source: Confections of a Foodie Bride, originally from King Arthur Flour


 Welcome! I'm Stephanie, a thirty something girl loving life with my husband Adam and our two little miracles living in gorgeous Southeast Tennessee. I'm passionate about Jesus, traveling, sports (Go Titans!), and of course food! Read more about me

