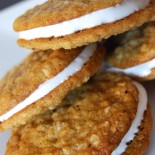
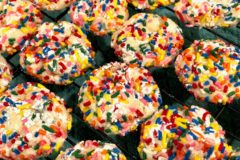
Italian Dressing (1 of 3)

There are so many recipes out there that utilize Italian Dressing. You can marinate your chicken in it, toss veggies in it and roast or grill them and so much more.  Well, I thought I would make my own at home instead of buying the bottled stuff.  This tasted so much like the store bought version, plus it used all pantry items that I keep on hand! I used it in pasta salad that I’ll be sharing with you next week, but it would be great on a regular tossed salad as well.

Italian Dressing (3 of 3)

Homemade Zesty Italian Dressing
Source: Penniless Parenting
Makes approximately 2 1/4 cups dressing

Ingredients:
1 cup white wine vinegar*
1 1/3 cup extra virgin olive oil
2 tbsp. water
1/2 tbsp. garlic powder
1/2 tbsp. onion powder
1/2 tbsp. sugar
1 tbsp. dried oregano
1/2 tsp. freshly ground black pepper
1/4 tsp. dried thyme
1/2 tbsp. plus 1/2 tsp. Italian Seasoning**
1 tbsp. salt

Directions:
In a medium sized bowl, add garlic powder, onion powder, sugar, oregano, pepper, thyme, Italian Seasoning and salt. Whisk together to combine.  (At this point you can store dry mix and add wet ingredients when ready to make dressing).

Add in the vinegar, olive oil & water. Whisk together to combine.  Transfer dressing to a jar or container with a sealable lid that you can shake up.  Place lid on container and store in the refrigerator. Dressing should last for a while. Shake well before using over chicken, veggies or salad.

Notes:
*Can sub white wine vinegar with regular vinegar or rice vinegar
**Can sub dried parsley or dried basil for the Italian Seasoning

Pin It
Print Friendly
Be Sociable, Share!

    { 16 comments }

    Related Posts Widget for Blogs by LinkWithin

    Strawberry Cake (7 of 7)

    For Mother’s Day my mom asked me to make her a dessert with strawberries or some sort of fruit.  Immediately a crumb cake type dessert came to my mine.  This cake was moist and flavorful but not too rich and it really highlighted the strawberries.  Everyone but me topped it with whipped cream (I’m not a whipped cream fan) but I bet it would be great topped with powdered sugar too, though it was fabulous just on it’s own.  This was so good that last night right before Adam & I went to bed, we cracked it back open and ate it right out of the pan, haha! I’m sure this would be great with other summer fruits as well. I’m excited to try it with adding in peaches & blueberries.

    Strawberry Cake (5 of 7)

    Fresh Strawberry Cake
    Source: Smitten Kitchen, originally Martha Stewart

    Ingredients:
    1 1/2 cups all purpose flour
    1 1/2 tsp. baking powder
    1/2 tsp. salt
    6 tbsp. unsalted butter, room temperature
    1 cup plus 2 tbsp. sugar, divided
    1 large egg
    1/2 cup milk
    1 tsp. vanilla
    1 lb. strawberries, hulled & halved

    Directions:
    Preheat oven to 350 degrees.  Butter a 9 inch spring form  pan (may also work in a 9 inch cake pan or deep dish pie pan), set aside.

    In a medium sized bowl, add flour, baking powder & salt and whisk together, set aside.

    In the bowl of a stand mixer fitted with the paddle attachment, cream together the butter with 1 cup sugar until fully incorporated and light & fluffy. Add in the egg, milk & vanilla and beat on medium speed just until incorporated.

    Reduce mixer to low and gradually add in the flour mixture, beat until just incorporated.  Remove bowl from stand and pour batter into prepared pan.

    Place the halved strawberries cut side down on to the top of the batter. Arrange them in a single layer, you may not use quite all of the strawberries, but should use most of them. Sprinkle remaining 2 tbsp. of sugar evenly over top of the cake.

    Bake cake for 10 minutes, then reduce oven to 325 degrees and continue baking for 50 more minutes, until cake is lightly golden brown and a toothpick inserted comes out clean.

    Keep cake in pan and place pan on cooling rack to cool completely.  Once cool, release outside of pan if using spring form pan.  Store cake in airtight container.  Serve topped with whipped cream &/or powdered sugar if desired.

    Strawberry Cake (6 of 7)

    Pin It
    Print Friendly
    Be Sociable, Share!

      { 5 comments }

      Related Posts Widget for Blogs by LinkWithin

      Gender Reveal (18 of 24)

      Baby Macaroni & Cheesecake is….A GIRL!!!! Last weekend we had a gender reveal party and it was so much fun! I wanted it to be fun but low maintenance for me, so we actually had it catered and a friend made the cake so I could focus on the decorations. And most of these decor ideas I found on Pinterest. Adam’s mom made this pinata for us and it worked perfectly! She made trap doors at the bottom and Adam & I put the streamers in and then pulled the strings and all the streamers came falling out.

      Gender Reveal Party Sign

      Adam & I both love football, so when I found an idea for a party that was football themed, I knew that was the route that we wanted to go.  So I found a few clip art helmets and created the invites & sign on Pic Monkey.

      Gender Reveal.2 (18 of 22)

      Gender Reveal Party Pic 2

      I got some precut cardboard triangles that had holes already punched in them and glued scrapbook paper to them and then got some chipboard letters and glued those on as well.  Then I punch holes in the scrapbook paper and ran the ribbon through. All the buckets that held the balloons I found at the Target Dollar Spot and placed tissue paper in them and taped the balloon strings to the inside of the buckets.

      Gender Reveal Party Pic

      Our dog is named Hershey, so I had to do the Hershey bars! I colored in the HE & SHE using sharpies. I did make the punch, the red punch is this Luscious Slush Punch and the blue is just Hawaiian Punch mixed with Minute Maid Lemonade. And for the cups, I took this idea and I created an image in Pic Monkey, then uploaded it to Vista Print and ordered stickers and placed them on the cups.

      Gender Reveal.1 (3 of 19)

      The cake was amazing! My friend Jessica did an amazing job!!

      Gender Reveal (13 of 24)

      We also had a station for everyone to pick their “team,” which gender they thought I was having.  I listed some of my symptoms/old wives tales and hung them to give hints to whether it was a boy or girl.  And there was a station for them to vote for their favorite baby names from our list of top choices.  Other than that, we didn’t play any games, just ate & mingled.

      Gender Reveal.1 (18 of 19)

      Gender Reveal.2 (6 of 22)

      Inspiration for Ideas:
      Invitations, Pinata, Cups, For the Team station I just googled my heart out to find the different old wives tales and picked my favorites. If you would like the original full size of the helmet poster, I’d be happy to send it to you, just email me at macaroniandcheesecake (at) gmail (dot) com

      Pin It
      Print Friendly
      Be Sociable, Share!

        { 26 comments }

        Related Posts Widget for Blogs by LinkWithin

        Sweet BBQ Sauce (1 of 4)

        BBQ is one of my favorite things to eat or order at a restaurant.  I especially love the sweet yet spicy sauces, so I knew I wanted to try and make one from scratch at home.  You will not believe how easy it is to make BBQ sauce! Just throw everything in the pot, bring to a boil and let simmer and that’s it! This sauce is sweet yet tangy and has a slight kick to it.  The flavors marry together perfectly. If you are making this sauce for more than just a few people, I would suggest doubling it.  This is great for cookouts this summer (or anytime)!

        Sweet BBQ Sauce (3 of 4)

        Sweet Carolina BBQ Sauce
        Source: Food.com

        Ingredients:
        1 cup ketchup
        3/4 cup apple cider vinegar
        3/4 cup brown sugar
        1/2 cup honey
        1 tsp. liquid smoke
        1/2 tsp. salt
        1/4 tsp. garlic powder
        1/4 tsp. onion powder
        Dash ground cayenne pepper

        Directions:
        Place all ingredients into a medium saucepan over medium high heat.  Stir mixture together until smooth.

        Bring to a boil and reduce heat to medium.  Leave uncovered and simmer for approximately 30 to 40 minutes, until mixture has reduced and thickened slightly.

        Remove from heat and let cool.  Mixture will thicken more as it cools.

        Serve atop your favorite bbq meat or use as a dipping sauce.

        Pin It
        Print Friendly
        Be Sociable, Share!

          { 6 comments }

          Related Posts Widget for Blogs by LinkWithin

          PB&J Cupcakes.2 (1 of 2)

          Today we are celebrating Krystal of Mrs. Regueiro’s Plate and her new little boy coming soon! Krystal is a dear blogging friend of mine. We met about 5 years ago on a cooking message board on The Nest and became fast friends.  She is so sweet, thoughtful and always encouraging! I can’t wait until we get to meet face to face, hopefully one day very soon! I’m so excited for her new little arrival coming and know her daughter, Elena will make a wonderful big sister! She and her husband refer to the baby as “cupcake” so it was only fitting that we do a virtual baby shower full of cupcakes! Check out the round-up of all the other amazing cupcakes on Eva Bakes!

          I eat PB&J almost every day or every other day for lunch, and I’ve been wanting to turn my sandwich love into a cupcake and I thought this was the perfect opportunity! I came across a recipe from The Cake Boss, and well I love that show so much so I knew I had to try them.  The cake is a vanilla cake, which had great texture and was moist but still sturdy enough to not fall apart.  The peanut butter frosting was Ah-Mazing!!! So silky smooth and fluffy. I could’ve literally eaten it by itself with a spoon.  The jelly in the middle gives a great addition of flavor and satisfies any pb&j craving in such a fun way! This vanilla cupcake was a great base cupcake for using your frosting/filling of choice as well.

          PB&J Cupcakes.2 (2 of 2)

          Cake Boss Peanut Butter & Jelly Cupcakes
          Source: Buddy Valastro (The Cake Boss) featured on Rachael Ray Show
          Makes 24 cupcakes

          Ingredients:

          For the Vanilla Cupcakes:
          2 1/2 cups cake flour*
          2 cups sugar
          3/4 cup vegetable oil
          2 1/4 tsp. baking powder
          1 tsp. vanilla
          1/2 tsp. sea salt
          4 eggs
          1 cup milk

          For the Peanut Butter Frosting:
          1 cup butter, softened
          1 cup creamy peanut butter
          5 1/2 cups confectioner’s sugar
          1 to 2 cups heavy cream

          For the Jelly Filling:
          1 cup strawberry jelly

          Directions:

          For the Vanilla Cupcakes:
          Preheat oven to 350 degrees.  Place cupcake liners into a cupcake tin, spray each liner with cooking spray (this helps the cupcake to come out easily after baking so no crumbs are left behind), set aside.

          In the bowl of a stand mixer fitted with the paddle attachment, add flour, sugar, vegetable oil, baking powder, vanilla & salt.  Beat on low until just combined.  Increase speed to medium low and beat approximately 1 more minute.

          With the mixer on medium low, add in eggs, 1 at a time, and mix until each is combined.  Pour in milk, 1/2 cup at a time, scraping down the sides between each addition.  Beat until fully incorporated and mixture is smooth.

          Using a large cookie scoop, scoop batter into the prepared cupcake tins, filling each cup 2/3 of the way full.  Bake for approximately 18 to 20 minutes, until lightly golden brown and a toothpick inserted comes out clean.

          Let cool in pan for several minutes, then pop out and place on a cooling rack to cool completely.

          For the Peanut Butter Frosting:
          In the bowl of a stand mixer, cream together butter and peanut butter until combined and smooth.  Add in confectioner’s sugar a little at a time, until it is a sandy consistency.  Pour in 1 cup of the cream and beat until incorporated.  Add in more cream if necessary.  You want it to be a smooth, fluffy consistency.

          For the Jelly Filling:
          Place jelly in a small bowl and stir together vigorously to break it down a bit and get it to a pipe-able consistency.

          For Assembly:
          Once the cupcakes have cooled, Cut an “X” into the top of each cupcake.

          Place jelly into a squeeze bottle or a piping bag and place tip of bottle or bag into the “X” of each cupcake. Fill each cupcake with approximately 1 tbsp. of jelly.

          Place peanut butter frosting into a piping bag, fitted with your favorite piping tip and frost the top of each cupcake.

          Store cupcakes in an airtight container at room temperature.

          Note: *For the cake flour: For each cup of Cake Flour you can place 2 tbsp. corn starch in a 1 cup measuring cup and fill the rest of the way full with all purpose flour. For the 1/2 cup, simply use 1/2 that amount.

          PB&J Cupcakes.1 (6 of 6)

          Pin It
          Print Friendly
          Be Sociable, Share!

            { 18 comments }

            Related Posts Widget for Blogs by LinkWithin

            Baked Oatmeal Cups (1 of 1)

            I pretty much eat one of two options for breakfast every morning during the week.  It’s either cereal or a Clif bar. Occasionally I have to grab a handful of nuts and a Kashi cookie on my way out the door. ;) I’m not a morning person at all and sleep until the last possible second with just enough time to get ready, so breakfast has to be quick and easy and sometimes portable for me.  I’m not a huge oatmeal lover, but I do like baked oatmeal so I thought I would try these baked oatmeal cups for a grab & go breakfast alternative.  These were fantastic! Moist and hearty and super easy to eat on the go.  What I love about them is that you can customize them to your taste.  I added in mini chocolate chips, but you could also do your favorite fruit: chopped peaches, strawberries, blueberries, etc.  Or you could even do dried cranberries and nuts, the possibilities are endless! Just make these over the weekend and you have breakfast ready to go Monday morning.  I bet these would freeze great too! What’s your go-to weekday breakfast?

            Baked Oatmeal Cups (1 of 3)

            Baked Oatmeal Cups
            Source: Heavenly Homemakers
            Makes 12 Oatmeal Cups

            Ingredients:
            2 cups quick cooking oats (rolled oats work as well)
            1/4 tsp. kosher salt
            1 tsp. baking powder
            1/2 cup honey
            2 eggs
            3/4 cup skim milk
            1/3 cup unsalted butter, melted
            1/4 cup mini chocolate chips, plus more for topping (optional)

            Other Topping Options:
            Strawberries
            Blueberries
            Peaches
            Apples

            Directions:
            Preheat oven to 350 degrees.  Spray a muffin tin liberally with cooking spray,* set aside.

            In a large bowl, add the oats, baking powder and salt.  Stir together briefly.  Add honey and stir to combine. Add eggs and then pour in the milk and melted butter.  Mix together until fully incorporated.  Mixture will be quite runny.  Add in 1/4 cup mini chocolate chips, if desired, and stir together to evenly distribute.

            Using a large cookie scoop or ice cream scoop, scoop batter into prepared muffin tin, filling each cup about 2/3 of the way full.  Sprinkle tops of each oatmeal cup with additional chocolate chips or desired toppings.

            Bake for approximately 25 to 30 minutes, until tops and edges are golden brown.  Remove from oven and let cool in the tin for a few minutes.  Once oatmeal cups have cooled slightly, run a knife around the outside of each muffin and gently lift it out of the tin.  Serve warm or let cool.  Store in an airtight container.

            Notes:
            *You can also use muffin/cupcake wrappers.  Just be sure that you spray each wrapper with cooking spray before adding in the batter.
            *I haven’t tried it myself, but I think these should freeze really well.
            *Next time, to make them a tad healthier I am going to try and sub 1/2 of the butter with applesauce, I’ll report back with how that works, or let me know if you try it.

            Pin It
            Print Friendly
            Be Sociable, Share!

              { 22 comments }

              Related Posts Widget for Blogs by LinkWithin

              Sopapilla Cheesecake Bars (4 of 4)

              So in continuing with our Mexican fiesta we’ve been having here the past week, you can’t have a fiesta without finishing it with dessert, right?!? These bars couldn’t be easier to put together and they would be great for any party, Mexican themed or not.  They are sweet and flaky and the cinnamon sugar & butter form a nice crust on top that gives it a great crunch.  Make these for your next party or gathering and I bet everyone will be asking you for the recipe! I preferred these warm, but they do taste great cold too.

              Sopapilla Cheesecake Bars (1 of 4)

              Easy Sopapilla Cheesecake Bars
              Source: Pillsbury

              Ingredients:
              2 canisters (8 oz. each) refrigerated crescent rolls
              2 pkgs. (8 oz. each) 1/3 less fat cream cheese, softened
              1 cup sugar
              1 tsp. vanilla

              For Topping:
              1/2 cup sugar
              1 tbsp. ground cinnamon
              1 stick (1/2 cup) unsalted butter, melted

              Directions:
              Preheat oven to 350 degrees.  Spray a glass 9 x 13 baking dish with cooking spray.

              Unroll one of the canisters of crescent rolls and spread dough in a single layer on the bottom of the prepared baking dish, ensuring that all triangles are pressed and sealed together.

              In the bowl of a stand mixer, beat together the cream cheese and 1 cup sugar until fully incorporated and light and fluffy in texture.  Add in vanilla and beat until incorporated.

              Gently spread the cream cheese mixture over top of the layer of crescent dough. Spread in an even layer.  Unroll remaining canister of crescent roll dough and lay over top of cream cheese mixture in a single layer, and press all triangles together to seal.

              In a small bowl, stir together the 1/2 cup sugar and 1 tbsp. cinnamon until combined, set aside.

              Melt butter and pour butter evenly over top of the crescent roll layered dish.  Sprinkle the cinnamon sugar mixture over top of the the melted butter in an even layer.  (It will seem like a lot but trust me it’s just right!)

              Bake for approximately 25 to 30 minutes, until top is browned and crunchy and center of dish has set.

              Let cool slightly, and if desired place in the refrigerator to chill to make it easier to cut into squares.  You can reheat the individual squares prior to serving.  I prefer these warm, but they taste good cold too.

              Store leftovers in an airtight container in the refrigerator.

              Pin It
              Print Friendly
              Be Sociable, Share!

                { 3 comments }

                Related Posts Widget for Blogs by LinkWithin

                Carnitas

                April 25, 2013 · 6 comments

                in mexican, pork

                Carnitas 2 (2 of 3)

                Several years ago I went to Don Pablo’s (LOVE!) with a few of my girl friends and saw they were featuring their carnitas. I had never even heard of that before, but I love pork and it had lots of fresh toppings (red onion, avocado, cilantro) so I rolled with it.  They were amazing!! To this day, if carnitas are on the menu I’m probably going to be ordering them.  They just have such a deep level of flavor.  So when I came across this at home recipe, I knew I had to try it.  Now, this isn’t really something you would cook on a weeknight as it’s a bit of a process, but it reheats really well so you could make it on the weekend and use it to make different meals during the week.

                What I loved about this recipe, was that the pork gets a little crispy and it has such a wonderful flavor, which comes from the slow cooking in the juices & spices.  We ate this first on tacos and then the next night in quesadillas, which I loved even more! Check out Karly’s recipe for Carnitas Pizza for another great way to use this recipe.  Also, I halved the recipe, which I listed below, so easily double it, but made plenty for 3 meals for us.

                Carnitas 2 (1 of 1)

                Carnitas
                Source: Buns in My Oven, originally Smitten Kitchen & Homesick Texan
                Serves Approximately 6

                Ingredients:
                2 to 2 1/2 lbs. pork butt or shoulder, cut into approximately 2 inch cubes, fat left on
                1/4 cup plus 1/8 cup orange juice
                1/8 cup lime juice (juice from 1 to 1 1/2 limes)
                2 cloves garlic, minced
                1 tsp. ground cumin
                1 tsp. kosher salt

                To serve:
                Flour Tortillas
                Avocado or Guacamole
                Lettuce
                Cilantro
                Salsa
                Cheese

                Directions:
                In a large dutch oven or heavy bottomed pot, add the cubed pork.  Pour in the orange juice, lime juice, garlic, cumin & salt. Add enough water to just cover the pork.

                Bring mixture to a boil. Once boiling, reduce heat and let mixture simmer uncovered for 2 hours. Do not stir during this time.

                After 2 hours, increase the heat to medium high and stir occasionally.  As you stir, the meat will begin to shred and fall apart.

                Cook meat for approximately 30 to 45 minutes, until water has evaporated and meat begins to become slightly crispy. Stir frequently during this period.  And it will probably have lots of steam and your pot will begin to turn black, this is normal. (Soak the pot overnight and it should clean up easily).

                Once water has evaporated and meat is slightly crispy, remove from heat and transfer to serving platter.

                Serve in tacos with desired toppings, or use meat in quesadillas with toppings or even on pizza! The meat is great by itself too with just rice & beans!

                *I didn’t try this, but if you want it less crispy, just take it off a bit sooner.

                Pin It
                Print Friendly
                Be Sociable, Share!

                  { 6 comments }

                  Related Posts Widget for Blogs by LinkWithin

                  Refried Beans (1 of 5)

                  So Cinco de Mayo is coming up and this week I thought I would share a couple of Mexican recipes to get you ready! You can also check up this round up I did last year for some great ideas as well. I love refried beans! I especially love to dip chips into the beans and then into sour cream. I always buy the canned kind but I found this awesome recipe so I thought I would try and make them at home. And Bonus! It uses the slow cooker so that makes it super easy, plus you don’t have to soak the beans overnight before hand! These were so smooth and creamy. I don’t think I will ever go back to the canned version!

                  Refried Beans (5 of 5)

                  Homemade Slow Cooker Refried Beans
                  Source: Slightly Adapted from Chef In Training

                  Directions:
                  3 cups dry pinto beans (don’t have to soak)
                  4 cups (32 oz.) low sodium chicken broth
                  1 cup water
                  1/2 tbsp. kosher salt
                  3/4 tsp. garlic powder
                  1/2 tsp. cumin
                  1/4 tsp. ground cayenne pepper
                  1/2 medium sweet onion
                  1/2 stick (1/4 cup) unsalted butter
                  Juice of 1/2 lime

                  Directions:
                  Place dry beans in a strainer and rinse.  Add beans to Slow Cooker.  Add in chicken broth, water, salt, garlic powder, cumin, & cayenne.  Stir briefly. Place the half sweet onion on top of the beans (just place the whole thing on there, don’t chop).

                  Cook on high for approximately 5 hours until beans have softened.  Stir occasionally during the 5 hours (I stirred about once an hour).  Add in water if it looks like too much liquid is evaporating (you want beans to at least be mostly covered until the last hour of cooking). Once cooked, remove the onion.

                  After cooking, If there is an excess amount of liquid, drain off the excess, reserving the liquid in a bowl. (Mine didn’t have a lot of liquid, so I didn’t drain off).

                  Add butter to beans and stir until butter has melted.  If you drained off the liquid, add a small amount of the reserved liquid and the lime juice to the beans and stir.

                  Add bean mixture to a blender or food processor.  Blend and add additional reserved cooking liquid until it reaches smooth, creamy, slightly runny consistency.  The beans will thicken up quickly. Serve immediately. Store leftovers in airtight container in the refrigerator.  To reheat, add a little water to the beans and heat in the microwave or on the stovetop.

                  Pin It
                  Print Friendly
                  Be Sociable, Share!

                    { 6 comments }

                    Related Posts Widget for Blogs by LinkWithin

                    I just want to thank everyone for your outpouring of love, thoughtful comments and support when we announced our big news last week that we are expecting.  We are so excited, and I wanted to share with you all our journey to get to this point.  We had been married for a little over 5 years and felt God lay it on our hearts that we were supposed to expand our family and have children. So I stopped my birth control and waited a few months for it to get out of my system and we started actively trying to have a baby in January 2012.

                    photo-1

                    I really thought it would happen quickly.  And each month I had various symptoms that led me to believe I might be pregnant (turns out that was endometriosis).  I learned that I couldn’t trust any of those symptoms when month after month the pregnancy tests were negative.  This was such an emotional roller coaster, being hopeful and optimistic that it would happen but at the same time not be too excited so that I wouldn’t get so upset if it didn’t.  And I think that when you are ready to have a baby, even the first month that it doesn’t happen is upsetting.

                    At my annual appointment with my gynecologist, I talked to her about our trying unsuccessfully and she did some blood work to check my hormone levels. Over the next several months I had a few appointments with her and all of my levels continued to be normal. She was so understanding and after 8 months of trying she told me that she felt that we had tried everything that we could do on our own. She recommended that we see a fertility doctor to get checked out further and try to figure out what was going on.  She said she didn’t want us to wait until it had been a full year because that was so long to wait emotionally, especially if it was something that could be fixed with medicine or a procedure.

                    Habbakuk

                    At this point I was very weary with the whole situation and cried out to God and just asked Him why we were going through this.  And when I did, such peace just descended upon me.  And God showed me at that moment that we were to have Joy despite our circumstances and not wish the days away but to make the most of each day. The song “Even If” by Kutless ministered to me so much through our entire journey. It talks about even if things don’t turn out like you thought, that God is still good and still faithful. So that’s the mentality we decided to have through this whole situation.  Not to say there weren’t a few bad days where we got down, but God really helped us to have an unexplainable joy and peace through it all.

                    In September, we visited Tennessee Reproductive Medicine which I can’t recommend enough! We both went through quite a bit of testing (blood work, exams, etc). and it was another month before we completed all the tests and got the results.  When we met with our Dr., she said that after reviewing all of our results, she was diagnosing us with multi-factor infertility.  Which basically means that Adam & I both had issues contributing to our infertility.  She told us that in our particular case, the only option that would work was to do IVF (in vitro fertilization).  She said that we had a 3% chance of getting pregnant on our own. They also discovered that I had 2 polyps in my uterus and I had to have surgery to remove those and also to remove endometriosis.  Our Dr. also told us she’s so glad that we went ahead and came in and didn’t wait until after we had tried for a year or more because she said we would’ve just kept trying without success.

                    We were pretty shocked honestly that IVF was our only option.  We really thought there were several things we would be able to do before it got to that point, but unfortunately that was just not the case in our situation.  We didn’t jump right in but took time to pray about it and weigh the pros and cons.  After much prayer, we felt God leading us down the path of IVF. I know that isn’t what everyone would choose and I respect anyone that would decide differently than we did, but for us it was the best decision to at least try it and see what happened.

                    In January 2013, we began our IVF cycle.  This consists of a couple weeks of daily stimulation shots to help your eggs grow and you go to the doctor every other day during this period to check your hormone levels and also to see how your eggs are growing.  Once the eggs are mature enough, they schedule the egg retrieval procedure, which you get put to sleep for. They go in and extract all the mature eggs and then they fertilize them.  Then you wait 3-5 days to let the embryos grow and then they do the implantation procedure which is when they insert the embryo (or embryos) into your uterus. This procedure isn’t painful at all and you are awake.  We decided just to implant 1 embryo this time (we froze the others hopefully for siblings in the future).   The next part is the hardest where you have to wait approximately 9 to 11 days for the pregnancy test.

                    That was the longest 9 days of my life I think!! I went in that morning for the blood work and then they call you that afternoon with the results. When they called and told me it was positive, I asked the nurse two more times just to be sure I heard her correctly!;) We are so thankful and thrilled that it worked the first time!!

                    Sorry this was such a lengthy post but I felt led to share it just in case it can help someone else that goes through infertility.  If you have more in depth questions about IVF, please feel free to email me at macaroniandcheesecake (at) gmail (dot) com

                    I also want to thank our family and friends who have prayed for us and supported us through this entire process. We couldn’t have made it without you!

                    Print Friendly
                    Be Sociable, Share!

                      { 44 comments }

                      Related Posts Widget for Blogs by LinkWithin