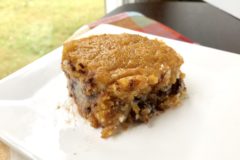
DSC_1417

As I mentioned last week, I am not a huge fan of green veggies so I’m always looking for new ways to make them enjoyable and tasty.  This method gave a great depth of flavor and would be a great addition to any meal! I will definitely be making this again and Adam really loved it. I halved the recipe below and it was plenty for the two of us with some leftover.

DSC_1423

Parmesan Roasted Broccoli
Source: Inspired by A Cedar Spoon, Recipe from Ina Garten via Food Network

Ingredients:
4 to 5 pounds broccoli
4 garlic cloves, minced
6 1/2 tbsp. extra virgin olive oil
1 1/2 tsp. salt
1/2 tsp. freshly ground black pepper
2 tsp. grated lemon zest
2 tbsp. lemon juice
1/3 cup shredded Parmesan cheese
Optional: 2 tbsp. fresh basil, chopped

Directions:

Preheat oven to 425 degrees.

Cut florets off of the broccoli stalks and discard the stalks (yields approximately 8 cups of florets). Spread the broccoli evenly on a baking sheet.  Toss broccoli florets with the garlic, 5 tbsp. of the olive oil, salt & pepper, coating evenly.

Roast broccoli in the oven for 20 to 25 minutes until the edges begin to brown.

In a large bowl, stir together 1 1/2 tbsp. olive oil, lemon zest, lemon juice, & parmesan.  Add roasted broccoli to the mixture and stir to coat.  Serve immediately.

Pin It
Print Friendly
Be Sociable, Share!

    { 4 comments }

    Related Posts Widget for Blogs by LinkWithin

    DSC_1381

    I’m always on the lookout for new side dishes as I get bored with the ones that we have all the time and I’m not a huge vegetable lover so I love side dishes like this that are creamy have my favorite vegetable, corn! This was so delicious and flavorful and I think it could’ve even used a tad more heat, so next time I will add in some ground red pepper.  Adam went crazy over this and was sad that I halved this recipe so we didn’t have any leftovers.  Next time I will definitely make the entire batch! This is great for a cookout or barbecue too, or any time of year!

    DSC_1389

    Jalapeno Creamed Corn
    Source: Mommy of a Monster & Twins

    Ingredients:
    1 stick (1/2 cup) unsalted butter, room temperature
    8 oz. 1/3 less fat cream cheese, room temperature
    2 cups sharp cheddar cheese, shredded (or cheese of your choice)
    3 jalapenos, seeded and chopped
    3 (11 oz.) cans white shoepeg corn, drained
    pinch ground cayenne pepper (optional)

    Directions:
    Preheat oven to 350 degrees.  Spray 9 x 13 baking pan lightly with cooking spray, set aside.

    In a large bowl, stir together the butter, cream cheese, cheese, chopped jalapenos, corn and cayenne (if using) until fully incorporated.  Pour into prepared pan and spread evenly.  Bake for approximately 45 minutes until bubbly.  Stir together before serving.

    *Notes: You may also want to stir a few times during baking (maybe once every 15 to 20 minutes) as mine got a crust around the edges from the cheese. Also, this dish is not super hot or spicy, jalapenos just add a nice layer of kick and flavor. Also, I just used regular yellow corn and it worked great, these come in 15 oz. cans though so you would have some corn leftover in your 3rd can.

    Pin It
    Print Friendly
    Be Sociable, Share!

      { 15 comments }

      Related Posts Widget for Blogs by LinkWithin

      DSC_1376

      I was reading through my Google Reader last week and saw these corn dogs on Chef-In-Training, which look amazing! I’ve been wanting one ever since.  Well, frying makes me a bit nervous since I’ve definitely had a big frying fail before, and I remembered these cute little baked corn dog mini muffins and thought that was the perfect way to satisfy my taste for a corn dog.  I used the Oscar Meyer Selects all beef hot dogs with no nitrates or nitrites, which were great tasting hot dogs! These corn muffins were so good! They are so tiny and cute and would also be great for a party.  And these are sure to be a  huge hit with the kiddos too! These use a homemade cornbread recipe (which actually made fabulous tasting cornbread too! Adam made us some cornbread pancakes with the leftover batter.), but you can certainly use a mix to save time.

      DSC_1379

      Mini Corn Dog Muffins
      Source: Six Sister’s Stuff, originally Iowa Girl Eats
      Makes approximately 48 muffins

      Ingredients:
      1/4 cup unsalted butter, melted
      1/4 cup unsweetened applesauce (or an additional 1/4 cup melted butter)
      1/2 cup sugar
      2 eggs
      1 cup buttermilk
      1/2 tsp. baking soda
      1 cup cornmeal
      1 cup all purpose flour
      1/2 tsp. salt
      8 to 10 all beef hot dogs, cut into 1 inch bites

      Directions:
      Preheat oven to 375 degrees.  Spray a mini muffin pan with cooking spray, set aside.

      In a medium sized bowl, stir together the melted butter, applesauce, and sugar until incorporated. Add in eggs and whisk together.  Pour in buttermilk and stir to combine.

      In a separate bowl, whisk together the baking soda, cornmeal, flour, & salt. In two batches, whisk dry ingredients into wet ingredients until fully incorporated.  Batter will be lumpy.

      Place one tablespoon of batter into each muffin cup. Stick one hot dog bite in the center of each muffin cup vertically.

      Bake for approximately 8 to 10 minutes, until muffins are golden brown. Remove muffins from oven and cool in the pan for a few minutes.  Run a knife around the edge of each mini muffin and pop them out.  Place on a plate and serve with ketchup and mustard for dipping if desired.

      Store leftovers in an airtight container in the refrigerator.  The leftovers taste great, just heat them in the microwave for approximately 20 seconds or so.

      Pin It
      Print Friendly
      Be Sociable, Share!

        { 8 comments }

        Related Posts Widget for Blogs by LinkWithin

        DSC_1350

        Happy Saturday everyone! Hope you are having a great weekend so far! I thought it would be fun to give you a peek inside my makeup bag. I don’t wear a ton of makeup but I always love seeing the products other people use so I thought I would share too. From the left is Mary Kay cream blush, Sephora eyeliner, Bare Minerals Powder, a new to me lipstick from Bite, Benefit’s They’re Real mascara, and the eye shadows are from MAC-they only require you to use a little bit so they last forever, and Mac eye cream which you put on before your eye shadow and it makes it thicker and nice and shimmery (I love this product)! (Disclaimer: I am not affiliated with any of these companies and have not been compensated in any way for sharing them, just telling you what I buy and use with my own money).

        DSC_1351

        Here is my facial cleansing regimen from Arbonne.  I want to preface that I do not sell Arbonne, nor am I getting paid in any way to endorse these products and I bought them all with my own moolah, I just really love this line especially because it uses all natural products! You start with the face wash which I forgot to include in the picture, then you use the toner which refreshes and wakes up your skin, then you use the serums (ultralift, eye cream, and renewal serum) and finish with the moisturizer.  This line is a bit pricey but it has lasted me several months (about 6) before I had to replenish anything.  I do only use this regimen once a day because I use an acne medication at night, but I use the face wash both in the morning at night.  It’s soft enough where it doesn’t irritate your skin but strong enough to remove your eye makeup which is great.  I absolutely love their makeup primer that I use before I put on my powder.  It makes my skin feel so soft and smooth and helps it look more even.

        photo

        In other news, If you follow me on instagram, facebook or Twitter, you already know that we said goodbye to cable today.  I really appreciate all of your tips and encouragement and positive experiences you shared on living without cable! Very encouraging to me! I should say that this is huge for me because I’m a bit of a TV addict. But, we realized we could save a lot of money and there are only a handful of shows that we watch every week and almost all of them are available to watch online.  The only thing is missing out on sporting events, which is huge in our household, but we just felt we were spending way to much time in front of the TV and not enough quality time with each other.  We’re hoping this will help us to read more, play games and spend more quality time together.  We will still watch some of our shows though, it’s all about balance. We got home from taking our cable box and had our TV scan to see if we got any of the public channels and our TV still picks up CBS, Fox, ABC & PBS so that is great news for Sunday NFL Football and Downton Abbey!:) Have you gotten rid of cable? What’s your favorite way to catch a few of your favorite shows?

        Print Friendly
        Be Sociable, Share!

          { 13 comments }

          Related Posts Widget for Blogs by LinkWithin

          DSC_1340

          I was wanting to make a dessert and I think you all probably know by now how much I love dessert bars.  They can be so easy to just mix everything in one bowl and pour it in the pan, pull out and cut and enjoy. So easy and delicious! I was asking my mom what I should make and she told me about these bars her friends brought to a party at their house and she just happened to have the recipe.  I had pretty much everything on hand, so I thought they sounded perfect, but of course I had to add chocolate chips! Because to me a peanut butter dessert just isn’t the same without chocolate!:) These were soft and chewy and pretty addictive! I kept getting little pinches off, you know “just one more bite!”

          DSC_1335

          Chocolate Chip Peanut Butter Bars
          Source: The Yielding Family

          Ingredients:
          1 stick butter
          1/2 cup crunchy peanut butter
          1 cup self rising flour
          1 1/2 cups sugar
          2 eggs
          1/2 cup light brown sugar, packed
          3/4 to 1 cup chocolate chips

          Directions:
          Preheat oven to 350 degrees.  Line a 9 x 13 pan with aluminum foil and spray liberally with cooking spray, set aside.

          In a medium heat safe bowl, add the butter.  Heat in microwave for 20 seconds, stir and heat for an additional 20 seconds. Add in peanut butter and microwave for 20 seconds and stir together until incorporated.  Heat in additional 20 second increments if necessary until melted.

          Add butter mixture to the bowl of a stand mixer.  Add in the flour, sugar, eggs & brown sugar.  Beat to combine.  Stir in 3/4 cup chocolate chips (adding up to 1 cup if desired) until evenly distributed. Batter will be thick.  Pour into prepared pan and spread evenly.  Bake for approximately 22 to 25 minutes until golden brown and middle has set.  Remove pan from oven and place on cooling rack.  Once bars have cooled, lift out of pan using aluminum foil and transfer to cutting board. Cut into squares and store in an airtight container.  I think these are best served slightly warmed up.

          Note: Mine took a little longer to bake and it was still a tad underdone but that actually made them nice and soft and chewy.

          Pin It
          Print Friendly
          Be Sociable, Share!

            { 22 comments }

            Related Posts Widget for Blogs by LinkWithin

            Homemade Spaghettios

            February 28, 2013 · 9 comments

            in pasta, soup

            DSC_1291

            I’ve had this recipe on my radar for several months and have been dying to try it.  When I heard that my friend Nikki at Pennies on a Platter was re-branding her site last week and is now blogging at Seeded at the Table, I thought it was a great time to highlight one of her fantastic recipes.  Her blog is one of my favorites, you definitely have to go check it out! These spaghettios were so good! We actually had it for dinner and it was quite filling.  The flavors marry perfectly and it’s so comforting and about 10,000 times better than the canned version! Next time I might scale back the garlic just a tad, but we thought it was fantastic and will definitely be making again.  And bonus, it’s super easy and quick to make so it would make for a great lunch or dinner, and it’s easily doubled.  Also, I should add that I took these photos with leftovers the morning after I made this, and it’s actually quite a bit soupier than the photos depict, which we loved.

            DSC_1287

            Homemade Spaghettios
            Source: Seeded at the Table
            Serves 4

            Ingredients:
            8 oz. ditalini pasta
            2 tbsp. extra virgin olive oil
            2 cloves garlic, minced
            pinch crushed red pepper
            15 oz. can tomato sauce
            1 cup water
            1 tbsp. tomato paste
            1/2 tsp. salt
            1/4 tsp. freshly ground black pepper
            1/2 tsp. sugar
            2 tbsp. unsalted butter, cut into pieces
            1/4 cup milk
            1 cup shredded cheddar cheese (or cheese of your choice), plus more for topping

            Directions:
            Bring a large pot of salted water to boil.  Add in ditalini pasta and cook according to package directions.  Once cooked, drain and place in large bowl, set aside.

            In the mean time, in a large skillet add the olive oil and heat over medium heat.  Add garlic and red pepper and cook approximately 30 seconds, until fragrant.  Pour in the tomato sauce, water, tomato paste, salt, pepper, sugar and butter. Heat and stir continually until the butter has completely melted.  Continuing to stir, slowly pour in the milk.  Reduce heat to low and simmer for approximately 10 minutes, stirring occasionally.

            Remove tomato mixture from heat and add in the cheese.  Stir together until cheese has completely melted.  Pour the tomato mixture over the bowl of noodles and stir together.  Mixture will be soupy.  If you don’t want yours to be quite as soupy, don’t add quite as much of the tomato mixture. Divide soup into individual bowls and top with additional cheese if desired.

            Pin It
            Print Friendly
            Be Sociable, Share!

              { 9 comments }

              Related Posts Widget for Blogs by LinkWithin

              DSC_1268

              My friend Jennifer made these for a cookie swap we went to at Christmas time and they were my favorite cookie there.  She also made them another time when a group of friends were getting together for dinner.  I couldn’t eat just one, so I knew I had to make these, especially since I had a ton of dried cranberries in my pantry.  These cookies are soft, chewy and have a great sweetness about them, and the dried cranberries add such a great texture.  Plus these are smaller cookies, so you don’t have to feel as guilty about eating more than one, right?!

              DSC_1261

              White Chocolate Cranberry Cookies
              Source: Taste of Home via my friend Jennifer
              Makes 24 to 32 cookies, depending on size

              Ingredients:
              1/3 cup unsalted butter, room temperature
              1/2 cup light brown sugar, packed
              1/3 cup sugar
              1 egg
              1 tsp. vanilla
              1 1/2 cups all purpose flour
              1/2 tsp. salt
              1/2 tsp. baking soda
              3/4 cup dried cranberries
              1/2 cup white chocolate chips

              Directions:
              Preheat oven to 375 degrees.  Cover a baking sheet with parchment paper, set aside.

              In the bowl of a stand mixer, add butter, sugar and brown sugar and beat until a crumbly texture. Add in egg and vanilla and mix until incorporated.

              In a small bowl, whisk together the flour, salt & baking soda. With the mixer on low, gradually add the flour mixture into the wet ingredients until incorporated.  Remove bowl from stand and fold in cranberries & white chocolate chips until evenly distributed.

              Using a small cookie scoop, scoop balls of dough onto prepared baking sheet, placing them 2 inches apart.  Bake for approximately 8 to 10 minutes, until edges of cookies are lightly golden.  Remove from oven and allow to cool on pan for a minute or two, then transfer to a cooling rack to cool completely.  Store in an airtight container.

              DSC_1269

              Pin It
              Print Friendly
              Be Sociable, Share!

                { 4 comments }

                Related Posts Widget for Blogs by LinkWithin

                Strawberry on Top

                February 24, 2013 · 0 comments

                in Uncategorized

                DSC_1247

                How was everyone’s Valentine’s Day? Did you do anything special? I was sick the week of Valentine’s so we just got food to go and watched a couple episodes of 24 Season 2, so it was actually really nice.  Adam surprised me with a gift card for a pedicure at my favorite place and he got me the super cute dish above for a blog prop and filled it with my favorite candy (twizzlers, sour gummy worms, & milk duds)! So thoughtful! What did your Valentine bring you?

                photo-5

                If you follow me on Instagram, you know that we had a date night out last night.  It was so nice! We went to J. Alexander’s and I got my favorite, the Cypress Salad. It has chicken tenders, avocado, and cornbread croutons-it’s awesome! It also comes with tomatoes and when I go my plate the tomatoes looked a purplish brown color.  I thought surely they wouldn’t send out bad tomatoes, so I asked our server and she told me they are a special kind of tomato called, Kumato Tomatoes that ripen from the inside out.  These are seriously the best tomatoes I’ve ever eaten! They had a great sweetness about them that just added so much flavor to the salad. Have you ever tried them? (Picture source)

                tomato

                After our delicious dinner, we ran a couple errands then went and got frozen yogurt. And we even made good use of Adam’s leftover steak today and had steak quesadillas for lunch after church.  What have you been up to this weekend?

                photo-4

                Print Friendly
                Be Sociable, Share!

                  { 0 comments }

                  Related Posts Widget for Blogs by LinkWithin

                  DSC_1230

                  I was looking for a quick and easy dessert to put together to take somewhere and came across these bars and thought they looked fabulous. I immediately got into the kitchen and whipped these up in no time.  They were really good, dense and chewy and cookie like.  These are great to take to a potluck, or for any occasion!

                  DSC_1231

                  Chocolate Chip Oatmeal Bars
                  Source: What Megan’s Making

                  Ingredients:
                  1/2 cup unsalted butter, room temperature
                  1/2 cup plus 1/8 cup brown sugar
                  1/4 cup plus 1/8 cup sugar
                  1 egg
                  1/2 tsp. vanilla
                  1 cup flour
                  1 tsp. baking powder
                  1/4 tsp. salt
                  1 cup quick cooking or old fashioned oats
                  3/4 cup semi-sweet chocolate chips

                  Directions:
                  Preheat oven to 375 degrees.  Line a 9 x 9 baking pan with aluminum foil and spray with cooking spray, set aside.

                  In the bowl of a stand mixer, beat together the butter, brown sugar, sugar, egg & vanilla until fully incorporated and light and fluffy.

                  In a separate medium sized bowl, whisk together the flour, baking powder, & salt.

                  With the stand mixer on low, add the flour mixture into the wet mixture a little at a time until just incorporated.

                  Remove bowl from stand and stir in the oats and chocolate chips.  Mixture will be thick.

                  Add dough to your prepared pan and press mixture into pan until evenly distributed.  Bake for approximately 20 minutes until lightly golden brown.  Allow bars to cool slightly.  While still slightly warm, lift bars out of the pan and carefully cut bars into squares.  Serve warmed up or at room temperature. Store in an airtight container.

                  Pin It
                  Print Friendly
                  Be Sociable, Share!

                    { 12 comments }

                    Related Posts Widget for Blogs by LinkWithin

                    DSC_1047

                    I’ve made BBQ Chicken taquitos, but I was looking for an easy dinner to make with some leftover shredded chicken and I thought it would be the perfect time to try the traditional creamy taquitos that have been floating around the internet.  These were so creamy and we loved them topped with salsa, sour cream & guacamole.  They are so easy to pull together and are fun to eat too! A great twist on Mexican instead of eating tacos or quesadillas.

                    DSC_1062

                    Baked Creamy Chicken Taquitos
                    Source: Chef -In-Training, originally Our Best Bites & Pennies on a Platter
                    Makes Approximately 12 Taquitos

                    Ingredients:
                    3 ounces 1/3 less fat cream cheese, softened
                    1/4 cup green salsa*
                    Juice from 1/2 lime
                    1/2 tsp. ground cumin
                    1 tsp. chili powder
                    1/2 tsp. onion powder
                    2 cloves garlic, minced
                    3 tbsp. cilantro, chopped
                    2 tbsp. green onions, sliced
                    2 cups shredded cooked chicken
                    1 cup shredded Mexican flavored cheese
                    small flour tortillas
                    salt
                    cooking spray
                    Salsa, Sour Cream & Guacamole for topping

                    Directions:
                    Preheat oven to 425 degrees.  Line a baking sheet with parchment paper, set aside.

                    In a large mixing bowl, stir together the cream cheese, salsa, lime juice, cumin, chili powder, onion powder, and garlic until fully incorporated.  Add in the cilantro and green onions and mix until combined.  Next stir in the chicken and shredded cheese and mix until fully incorporated.

                    On a microwaveable plate, place 2 to 3 tortillas at a time and top with a damp paper towel.  Microwave for approximately 15 to 20 seconds until softened and pliable.

                    Once tortillas have softened, scoop 2 to 3 tbsp. of the chicken cream cheese mixture into the center of the tortilla.  Roll up the tortilla as tightly as possible.  Place seam side down on your prepared baking sheet, ensuring taquitos don’t touch each other on the baking sheet.  Repeat with remaining tortillas until all chicken mixture has been used.

                    Spray the tops of the taquitos with cooing spray and lightly sprinkle with salt.

                    Bake for approximately 15 to 20 minutes, until tortillas are crispy and lightly golden. Serve topped with salsa, sour cream & guacamole if desired.

                    *I used regular salsa because that is what I had on hand and they still tasted great!

                    Pin It
                    Print Friendly
                    Be Sociable, Share!

                      { 8 comments }

                      Related Posts Widget for Blogs by LinkWithin