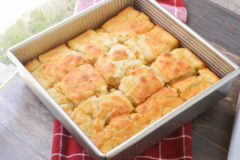
DSC_1230

I was looking for a quick and easy dessert to put together to take somewhere and came across these bars and thought they looked fabulous. I immediately got into the kitchen and whipped these up in no time.  They were really good, dense and chewy and cookie like.  These are great to take to a potluck, or for any occasion!

DSC_1231

Chocolate Chip Oatmeal Bars
Source: What Megan’s Making

Ingredients:
1/2 cup unsalted butter, room temperature
1/2 cup plus 1/8 cup brown sugar
1/4 cup plus 1/8 cup sugar
1 egg
1/2 tsp. vanilla
1 cup flour
1 tsp. baking powder
1/4 tsp. salt
1 cup quick cooking or old fashioned oats
3/4 cup semi-sweet chocolate chips

Directions:
Preheat oven to 375 degrees.  Line a 9 x 9 baking pan with aluminum foil and spray with cooking spray, set aside.

In the bowl of a stand mixer, beat together the butter, brown sugar, sugar, egg & vanilla until fully incorporated and light and fluffy.

In a separate medium sized bowl, whisk together the flour, baking powder, & salt.

With the stand mixer on low, add the flour mixture into the wet mixture a little at a time until just incorporated.

Remove bowl from stand and stir in the oats and chocolate chips.  Mixture will be thick.

Add dough to your prepared pan and press mixture into pan until evenly distributed.  Bake for approximately 20 minutes until lightly golden brown.  Allow bars to cool slightly.  While still slightly warm, lift bars out of the pan and carefully cut bars into squares.  Serve warmed up or at room temperature. Store in an airtight container.

Pin It
Print Friendly
Be Sociable, Share!

    { 12 comments }

    Related Posts Widget for Blogs by LinkWithin

    DSC_1047

    I’ve made BBQ Chicken taquitos, but I was looking for an easy dinner to make with some leftover shredded chicken and I thought it would be the perfect time to try the traditional creamy taquitos that have been floating around the internet.  These were so creamy and we loved them topped with salsa, sour cream & guacamole.  They are so easy to pull together and are fun to eat too! A great twist on Mexican instead of eating tacos or quesadillas.

    DSC_1062

    Baked Creamy Chicken Taquitos
    Source: Chef -In-Training, originally Our Best Bites & Pennies on a Platter
    Makes Approximately 12 Taquitos

    Ingredients:
    3 ounces 1/3 less fat cream cheese, softened
    1/4 cup green salsa*
    Juice from 1/2 lime
    1/2 tsp. ground cumin
    1 tsp. chili powder
    1/2 tsp. onion powder
    2 cloves garlic, minced
    3 tbsp. cilantro, chopped
    2 tbsp. green onions, sliced
    2 cups shredded cooked chicken
    1 cup shredded Mexican flavored cheese
    small flour tortillas
    salt
    cooking spray
    Salsa, Sour Cream & Guacamole for topping

    Directions:
    Preheat oven to 425 degrees.  Line a baking sheet with parchment paper, set aside.

    In a large mixing bowl, stir together the cream cheese, salsa, lime juice, cumin, chili powder, onion powder, and garlic until fully incorporated.  Add in the cilantro and green onions and mix until combined.  Next stir in the chicken and shredded cheese and mix until fully incorporated.

    On a microwaveable plate, place 2 to 3 tortillas at a time and top with a damp paper towel.  Microwave for approximately 15 to 20 seconds until softened and pliable.

    Once tortillas have softened, scoop 2 to 3 tbsp. of the chicken cream cheese mixture into the center of the tortilla.  Roll up the tortilla as tightly as possible.  Place seam side down on your prepared baking sheet, ensuring taquitos don’t touch each other on the baking sheet.  Repeat with remaining tortillas until all chicken mixture has been used.

    Spray the tops of the taquitos with cooing spray and lightly sprinkle with salt.

    Bake for approximately 15 to 20 minutes, until tortillas are crispy and lightly golden. Serve topped with salsa, sour cream & guacamole if desired.

    *I used regular salsa because that is what I had on hand and they still tasted great!

    Pin It
    Print Friendly
    Be Sociable, Share!

      { 8 comments }

      Related Posts Widget for Blogs by LinkWithin

      I was hoping to have a new treat to post today in preparations for Valentine’s Day, but last week was super crazy busy and I worked a youth retreat this past weekend and then I proceeded to lost my voice and was under the weather.  So needless to say, no yummy treats were baked in my kitchen. So I thought I would share with you some Valentine’s Day ideas for a romantic dinner and dessert you can make at home.

      valentine's savory

      From Top Left, going clockwise: 
      Lighter Chicken Parmesan
      Flank Steak
      Bowtie Pasta with Creamy Mushroom Sauce
      Spinach Stuffed Shells
      Herbed Rubbed Chicken with Orzo

      valentine desserts

      From Top Left, going clockwise: 
      Chocolate Cake Donuts
      Red Velvet Brownies
      Peanut Butter Snickers Mini Cheesecakes
      Chocolate Butterfinger Cake
      Cheesecake with Fresh Strawberry Sauce

      Print Friendly
      Be Sociable, Share!

        { 8 comments }

        Related Posts Widget for Blogs by LinkWithin

        Cinnamon Roll Cake

        February 7, 2013 · 18 comments

        in Breakfast, cake

        DSC_1196

        I had a breakfast meeting recently for a youth retreat that I’m working this weekend and I was supposed to bring a delicious breakfast item.  I was planning to make homemade cinnamon rolls, but I didn’t have enough time and I wanted something a bit easier to put together.  My friend Courtney posted a picture of the cinnamon roll cake she had just made on Instagram and I knew that I wanted to make it right away for the meeting the next morning.  This was really not to hard to put together and it tasted wonderful! Sweet but not overly rich and super moist.  Adam said it tasted better each day!

        DSC_1178

        Cinnamon Roll Cake
        Source: Six Sister’s Stuff

        Ingredients:
        3 cups flour
        1/4 tsp. salt
        1 cup sugar
        4 tsp. baking powder
        1 1/2 cups milk
        2 eggs
        2 tsp. vanilla
        4 tbsp. butter, melted
        2 sticks (1 cup) butter, softened
        1 cup brown sugar, packed
        2 tbsp. flour
        1 tbsp. cinnamon

        Glaze:
        2 cups confectioner’s sugar
        5 tbsp. milk
        1 tsp. vanilla

        Directions:
        Preheat oven to 350 degrees.  Spray a 9 x 13 baking pan with cooking spray, set aside.

        In the bowl of a stand mixer, add 3 cups flour, sugar, salt, baking powder, milk, eggs, & vanilla.  Mix until fully incorporated.  Reduce speed to low and slowly pour in the 4 tbsp. melted butter. Pour batter into prepared pan and spread evenly.

        Clean your stand mixer bowl and once clean, add in the 2 sticks softened butter, brown sugar, 2 tbsp. flour, and cinnamon.  Beat until fully incorporated.  Mixture will be thick.  Spoon dollops of the cinnamon butter mixture on top of the cake batter.  Use a knife to swirl the cinnamon butter mixture into the cake.

        Bake for approximately 25 to 30 minutes, until a toothpick inserted comes out clean. Remove cake from oven and place in pan on a cooling rack.

        Meanwhile mix together your glaze.  In medium sized bowl, whisk together the confectioner’s sugar, milk and vanilla. Pour over cake while it is still warm and carefully swirl the pan around or spread the glaze around so that it is evenly distributed over the cake.  Serve cake warm or at room temperature.  Store leftovers in airtight container.

        Pin It
        Print Friendly
        Be Sociable, Share!

          { 18 comments }

          Related Posts Widget for Blogs by LinkWithin

          DSC_1209

          My dearest friend just had her second baby a week ago and I wanted to take them dinner. I had a dish similar to this once and it came to my mind, so I thought it would be a great dish to make for them.  I made this for us earlier in the week to test it out and make sure it turned out good before I made it for them.  It was so fabulous! Adam said it had definitely better go on our regular rotation.  So I made another one for them and they loved it too! You could add any of your favorite pizza toppings into this: green pepper, mushrooms, olives, ham, etc.  This is a great weeknight dish! I bet you could even brown the meat, cook the noodles, and assemble it and put it in the freezer and then thaw it out and bake when you are ready.

          DSC_1210

          Pizza Pasta Bake
          Source: Taste of Home
          Makes one 9 x 13 dish

          Ingredients:
          1 tbsp. extra virgin olive oil
          1 lb. ground beef
          1/2 onion, chopped
          1/2 box of rotini noodles (approx. 2 1/2 cups)
          1 jar spaghetti sauce (approx. 4 cups)
          1 tbsp. Italian seasoning
          salt & pepper to taste
          8 oz. shredded mozzarella or cheese of your choice*
          Sliced Pepperoni
          Other Toppings of Your Choice

          Directions:
          Preheat oven 35o degrees. Spray a 9 x 13 dish with cooking spray.

          In a large skillet, add the olive oil and heat over medium heat.  Add in the onions and saute for a couple minutes, until slightly translucent.  Add ground beef and cook until browned and cooked through.

          Meanwhile, bring a medium sized pot of water to boil.  Once boiling add a sprinkling of salt and then add in the rotini noodles.  Cook according to package directions, until al dente.  Drain noodles.

          In a large bowl, place the beef mixture. Add in the spaghetti sauce, Italian seasoning, pinch salt & pepper.  Stir together. Add in cooked noodles and stir together.

          Pour mixture into the prepared baking dish.  Top with shredded cheese.  Place pepperoni slices on top and any additional toppings of your choice.

          Bake for approximately 25 to 30 minutes, until cheese has melted and mixture is slightly bubbly.

          Notes: *I used a 4 cheese Mexican blend for ours because that’s what I had on hand.

          Pin It
          Print Friendly
          Be Sociable, Share!

            { 14 comments }

            Related Posts Widget for Blogs by LinkWithin

            Hope you all are having a great weekend! Any big Super Bowl plans? We are keeping it low key and getting some pizzas with some friends.  A good bloggy friend of mine, Nicole over at The Marvelous Misadventures of a Foodie has started posting monthly posts of what she’s into currently and I thought I would play along this month.  I would love for you to pick one or two and answer in the comments!:)

            DSC_0883

            Loving: My new wreath that my friend Jennifer & I made. It was super easy, we bought a stick type wreath and then painted the letter and made a few felt flowers and hot glued everything to the wreath and tied it all with a bow.

            Watching: Adam & I loved 24 but we only saw the last 2 seasons.  We found season one at a used bookstore and are already onto Season 2! It’s so addictive and so good! After one episode, we always say, let’s just watch one more!;)

            Anticipating: Going to see Bon Jovi in concert next month!! Adam surprised me with tickets for my Christmas present.

            Listening to: Loving Chris Tomlin’s new song “Whom Shall I Fear” and Jesus Culture “One Thing Remains”

            Planning: Been trying to brainstorm Valentine’s Day ideas.  Adam & I don’t normally do much for Valentine’s because we do fun stuff all throughout the year, but last Valentine’s I found myself wishing that we had planned something and gotten something special for each other, so I decided that we would do something fun this year.  But I need help figuring out what to do, what do you have planned for Valentine’s?

            Working On: Still working on reformatting my old posts (when I switched from blogger to wordpress some of the spacing on my old posts went crazy) and adding the pin it button to all of them.  I’ve made it through 3 years and just have to finish the first year and a half of posts.  Hopefully soon!

            Wishing: For a real snow! Enough to get out and play in and build a snowman!

            Print Friendly
            Be Sociable, Share!

              { 2 comments }

              Related Posts Widget for Blogs by LinkWithin

              DSC_1025

              I may have mentioned it on here, but back in the fall I was in a baking/cooking/blogging rut where I couldn’t figure out what to make and just didn’t want to get in the kitchen.  I powered through it and kept getting in the kitchen and looking for inspiration and with the holidays and God’s help, I quickly came out of it.  I had a sort “bloggers cooking block” and I just could not figure out what to make and blog and Adam was helping me brainstorm one night and said, why not make Peanut Butter Donuts? So I put them on my list of things to make and then the holidays came and went and I realized I had never made them.

              Some friends of mine recently had a baby and we were taking them dinner and I knew that would be the perfect time to try them.  So I went in search of a recipe and found a fabulous one! The first batch I made came out a little dry so I upped the wet ingredients and they came out perfectly the second time! Very moist and flavorful,  and this glaze is phenomenal!! Definitely do not skip out on it!  I did try a couple dipping the entire donut in the glaze and the donut kind of fell apart, so I recommend just dipping the top half like I did in the ones pictured here.  Also, they were just as good without the reese’s on them if you want to skip that part.

              DSC_1035

              Baked Chocolate Glazed Peanut Butter Donuts
              Source: Donut Recipe from Fake Ginger, Glaze from Group Recipes
              Makes 6 Donuts

              Ingredients:

              For the Donuts:
              1/4 cup peanut butter
              1/4 cup sugar
              1/2 cup milk
              2 tbsp. canola oil
              1/2 tsp. vanilla
              1 egg
              1 cup all purpose flour
              1 tsp. baking powder
              1/4 tsp. salt

              For the Glaze:
              1/4 cup unsalted butter
              1/8 cup milk, warmed
              1/2 tbsp. light corn syrup
              1 tsp. vanilla
              2 oz. semi-sweet chocolate chips
              1 cup confectioner’s sugar
              Reese Cups, chopped for topping (optional)

              Directions:

              For the Donuts:
              Preheat oven to 325 degrees.  Lightly spray your donut pan with cooking spray, set aside.

              In a small bowl, whisk together flour, baking powder, and salt, set aside.

              In the bowl of a stand mixer, add peanut butter and sugar and beat together until light & fluffy.  Add milk, oil, vanilla and egg and beat together until fully incorporated.

              With the mixer on low, gradually add in the flour mixture and mix until just incorporated.

              Place a ziploc bag in a large glass and turn the opening of the bag out over the glass, making it easier to transfer the batter to the bag.  Add the batter to the bag and cut a large slit in the corner of the bag and pipe the batter into the prepared donut pan, filling each donut tin almost full (you want to use all of the batter for the 6 donuts).

              Bake for approximately 8 to 10 minutes, until golden brown and donuts bounce back when touched.  Using a fork, gently pop each donut out of the tin and transfer to a cooling rack.

              For the Glaze:

              While donuts are baking, make the glaze.

              In a small saucepan, add the butter, milk, corn syrup, and vanilla and heat over medium heat until the butter has completely melted.  Remove from heat and pour mixture through a sieve into a heat safe bowl.  Transfer drained mixture back to the saucepan.

              Place saucepan over low heat and add in the chocolate chips and stir until chocolate is melted and smooth. Remove chocolate mixture from heat and pour mixture through sieve again into another small bowl.  Add confectioner’s sugar  to the chocolate and whisk together until fully incorporated.  If mixture is too thick add a splash of milk (approx. 1 tbsp). if too thin, add approx. 1 tbsp. of confectioner’s sugar.

              Once donuts have cooled slightly (for just a few minutes) dip each donut into the chocolate glaze and place back on the cooling rack.  If desired, sprinkle chopped Reese Cups on top of the glaze. Allow to set for approximately 30 minutes. Store donuts in an airtight container.

              Pin It
              Print Friendly
              Be Sociable, Share!

                { 18 comments }

                Related Posts Widget for Blogs by LinkWithin

                DSC_0726

                I actually made this punch for our Post Christmas Pajama Party and it was a HUGE hit! No one even opened the soft drinks, everyone just drank the punch. This punch is maybe the best punch I have ever had. I kid you not! It had such a great flavor and wasn’t too fizzy. So when Holly @ Life as a Lofthouse asked me to participate in a Surprise Virtual Baby Shower for Mandy @ Mandy’s Recipe Box, I knew this would be the perfect thing to bring to the baby shower! Mandy seems like such a sweetheart and her blog is fabulous so definitely go check it out! She posts a weekly link-up party called Totally Tasty Tuesdays and I am dying to try her S’mores Fudge! Mandy and her husband are waiting until they have their baby to find out whether the baby is a boy or girl, which is so exciting! Congratulations Mandy! I am so excited for you and I can’t wait to find out whether your new little one is a mister or miss!

                Mandy Baby Shower

                There are several other bloggers participating in the Virtual Baby Shower so be sure and pop over and see what they brought! The Luscious Slush Punch Recipe is below!

                Holly @ Life as a Lofthouse
                Brandie @ The Country Cook
                Aimee @ Shugary Sweets
                Jocelyn @ Inside BruCrew Life
                Dorothy @ Crazy for Crust
                Nikki @ Chef in Training
                Stephanie @ Back for Seconds
                Ashton @ Something Swanky
                Becca @ Crumbs and Chaos
                Hayley @ The Domestic Rebel

                DSC_0737

                Luscious Slush Punch
                Source: Allrecipes.com

                Ingredients:
                1 1/4 cups sugar
                3 cups water
                1 (3 oz.) package strawberry jello mix
                24 ounces pineapple juice*
                1/3 cup lemon juice
                2 cups (16 ounces) orange juice
                1 (2 Liter) Sprite or other Lemon Lime carbonated beverage

                Directions:
                In a medium sized pot, add sugar, water and jello mix and bring to a boil. Boil for exactly 3 minutes. Remove from heat and add in pineapple juice, lemon juice, and orange juice. Stir to combine. Let cool completely.

                Once cool, transfer mixture into a freezable container or gallon sized ziploc bag. If using a ziploc bag, make sure you double bag it. Place mixture in freezer for several hours or overnight. I made this the night before the party (around 7 or 8 pm) and took it out around mid day the day of the party and transferred it to the refrigerator. You want the mixture to be slightly slushy and not frozen solid.

                Just before party time, pour slushy mixture into a punch bowl and pour sprite over top. Stir and serve! Store any leftover punch in the refrigerator.

                *For the Pineapple juice, I bought a 6 pack of the small 6 ounce pineapple juice cans and used four of them and saved the other 2 for another recipe. That way you don’t have to buy the huge can and half half of it left over.

                Shared with Buns in My Oven What’s Cookin’ Wednesday

                Pin It
                Print Friendly
                Be Sociable, Share!

                  { 25 comments }

                  Related Posts Widget for Blogs by LinkWithin

                  DSC_1113

                  I’m not a huge Chinese food person.  I like about 3 entrees of chinese: beef & broccoli, lettuce wraps and I absolutely LOVE chicken fried rice! Especially the kind from the mall food court, right?! But it is super greasy and I can’t imagine how many calories, so I thought I would try an at home version that I came across.  This was really good and gave me that chinese food fix without all the calories and grease.  It was fairly easy to pull together if you chop and place out all your ingredients ahead of time and have them ready to throw in.  I served these alongside of baked egg rolls (which are so good)!

                  DSC_1129

                  Healthier Chicken Fried Rice
                  Source: Iowa Girl Eats
                  Serves 4

                  Ingredients:
                  4 cups cooked brown rice*
                  2 boneless skinless chicken breasts, cut into bite sized pieces
                  Salt & Pepper
                  1 cup frozen mixed vegetables
                  2 green onions, chopped
                  2 cloves garlic, minced
                  2 eggs
                  4 tsp. sesame oil, divided
                  1/4 cup low sodium soy sauce

                  Directions:
                  Prepare, chop and measure out all ingredients so they are ready to throw in when you need them. Whisk the two eggs together with 2 tsp. sesame oil, set aside. Season chicken pieces with salt  & pepper.

                  In a large skillet or wok, heat 1 tsp. sesame oil over medium heat. Add chicken to skillet and cook, stirring frequently until chicken is cooked through.  Once chicken is cooked, remove from skillet and transfer to a plate.

                  Add remaining tsp. sesame oil to skillet. Stir in the mixed vegetables and green onions and cook for approximately 2 minutes, until fork tender.  Add in garlic and cook about 30 seconds more.  Scoot vegetables to the side of the skillet and add in your egg mixture and scramble the eggs.

                  Once eggs are scrambled, add the chicken back to the skillet along with the cooked brown rice and soy sauce.  Stir together until everything is fully incorporated.  Cook for a few minutes until heated through.  Serve with additional soy sauce for drizzling over top.

                  *Note: It is best to use rice that you cooked at least one day prior and stored in the refrigerator.  Maybe use leftovers from a previous meal, or I just cooked the rice specifically for this dish one day ahead.

                  Pin It
                  Print Friendly
                  Be Sociable, Share!

                    { 8 comments }

                    Related Posts Widget for Blogs by LinkWithin

                    DSC_0911

                    As promised, here are the granola bars that I made with the Applesauce Granola that I posted last week.  I always used to love getting the Quaker Chewy Granola bars and the S’mores were always my favorite, so when I came across a recipe for a homemade version I knew I had to try them! These were SO good! Soft and chewy and sweet and they had the perfect S’mores flavor that I loved.  The great thing is you can mix this up and incorporate different flavors, leave out the marshmallows and add peanut butter and peanut butter chips, or do white chocolate chips and dried cranberries and add in some nuts.  The possibilities are endless! These really were very easy to make and they are a no bake recipe, which is even better!

                    DSC_0915

                    Chewy S’mores Granola Bars
                    Source: Back to the Cutting Board, Originally from Rachael Ray
                    Make approximately 16 to 18 bars, depending on how you cut them

                    Ingredients:
                    4 tbsp. (1/2 stick) unsalted butter
                    1/4 cup light brown sugar, packed
                    1/4 cup honey
                    2 cups granola
                    1 cup Rice Krispies
                    2 tbsp. graham cracker crumbs (optional)
                    1 cup mini marshmallows
                    1/2 cup semi-sweet chocolate chips

                    Directions:
                    Line two 9 x 5 loaf pans with foil and spray lightly with cooking spray, set aside.

                    In a medium sized saucepan, add butter, brown sugar, and honey. Heat over medium heat and stir together to combine. Continue stirring until butter has melted completely.

                    Bring butter mixture to a boil. Once boiling, lower heat to medium low and simmer approximately 2 minutes, until sugar has dissolved.  (I wouldn’t heat for more than 2 minutes so that your bars will remain soft once put together).  Remove pan from heat.

                    Add in the granola, rice krispies, and graham cracker crumbs and stir to combine, ensuring they are evenly coated.

                    Gently stir in the marshmallows. Divide the mixture evenly between the two loaf pans and spread and press the mixture down into each pan.  Press chocolate chips into the bars, distributing evenly.

                    Let set for approximately 15 to 20 minutes until cooled and mixture has set.  Lift bars out of the loaf pans and cut into individual granola bars.  Store in an airtight container.

                    Pin It
                    Print Friendly
                    Be Sociable, Share!

                      { 18 comments }

                      Related Posts Widget for Blogs by LinkWithin